As an amazon Associate I earn from qualified purchases. Thank You!
Turning regular handheld radios into a fun and personalized tool.
As a pilot car driver one of the most important, if not THE most important piece of equipment is our radios. Both the mobile radios that are mounted in our vehicles and the handheld radios, commonly known as Walkie-Talkies, are used to keep in constant communication with the members of our Superload or Oversize load team. They have to work properly and be loud and clear to help ensure not only the safety of our teams, but the motoring public as well.
This job can be flat out dangerous. That’s all there is to it. The motoring public doesn’t care much for us being in their way and sometimes negotiating the nation’s highways and byways with 200’ plus superloads can be pretty stressful. It can also be very pretty boring and repetitive.
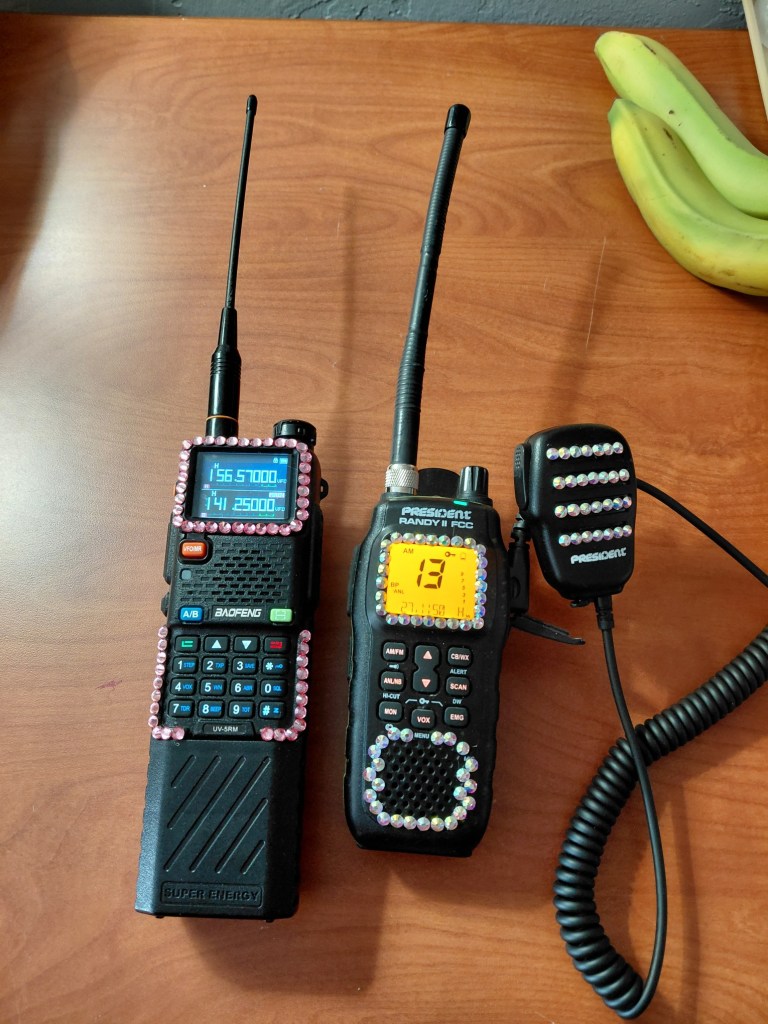
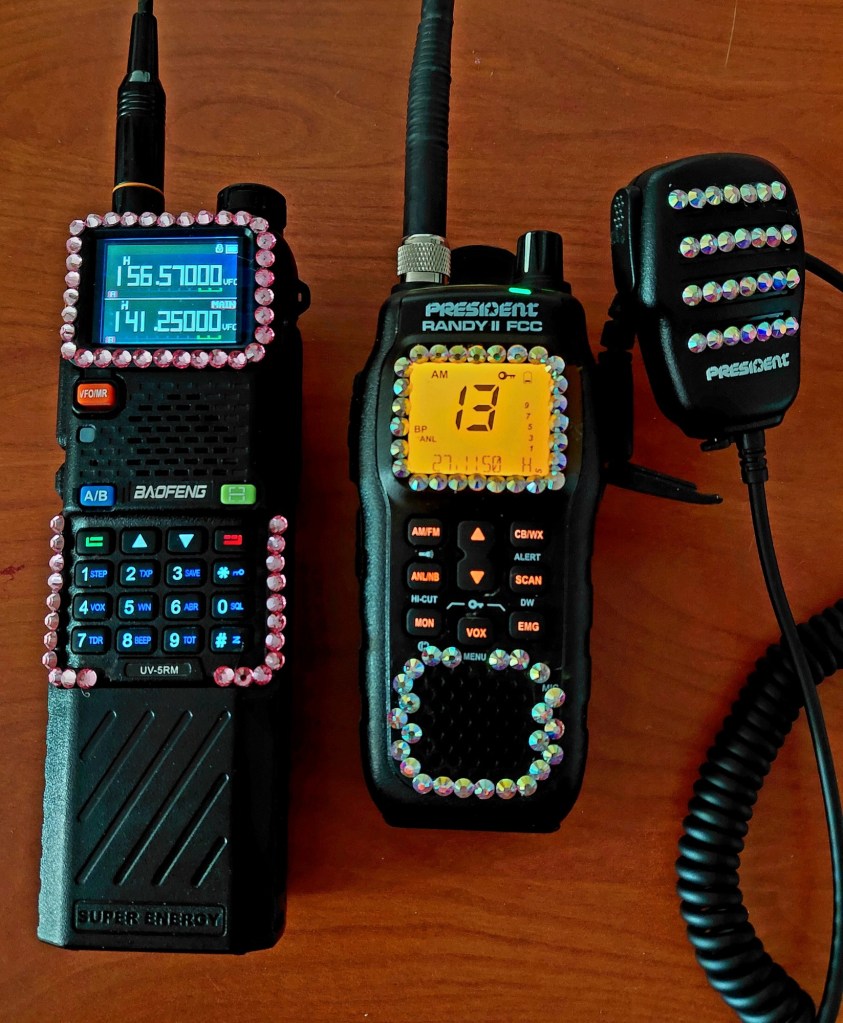
Anytime I get a chance to make one of my team members smile or manage to get a chuckle from them, I take full advantage of it. So when I got my new handhelds I thought; “I’m gonna bedazzle my radio’s!” That’s just what I did!
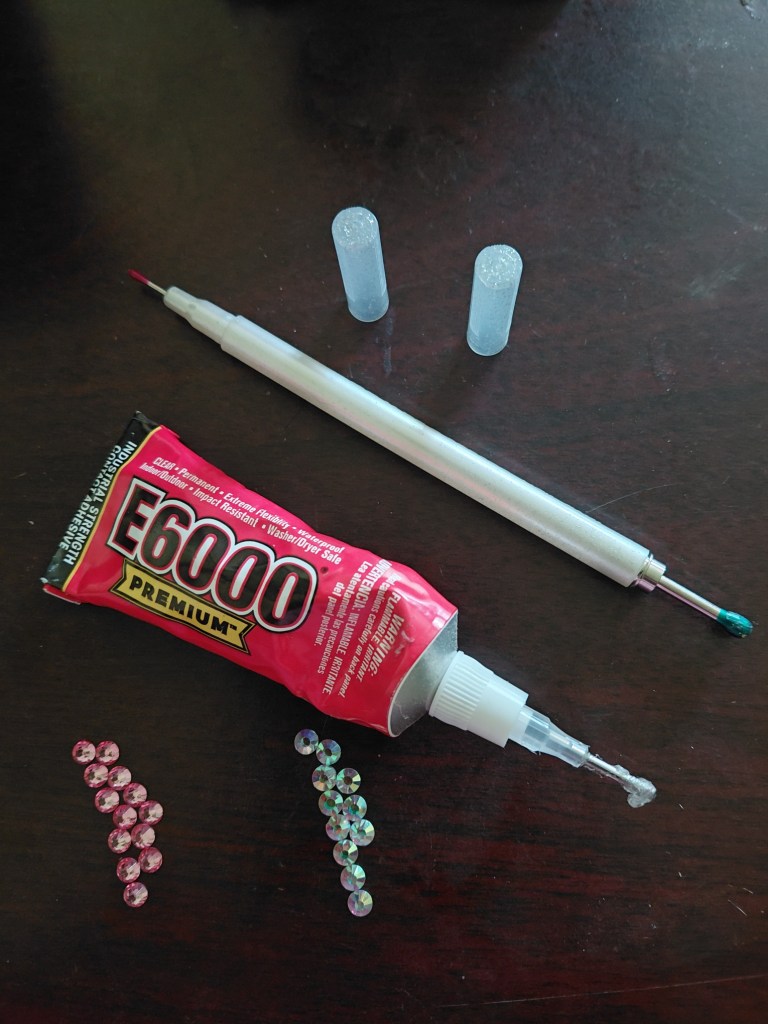
At the top is a “Jewel Picker”. Most of these come with sticky ends used to pick up and place the rhinestones easily on glue. E6000 glue should be in every household junk drawer as it can literally be used on anything. Flatback Rhinestones in size “ss20” or “4mm” were the perfect size for this project.
My CB handheld has a green accent stripe so I found some iridescent greenish rhinestones to go with it and my VHF handheld had a plain black plastic casing so I opted for a muted pink rhinestone for it. I had a tube of E6000 glue so I just ordered the rhinestones and away I went!
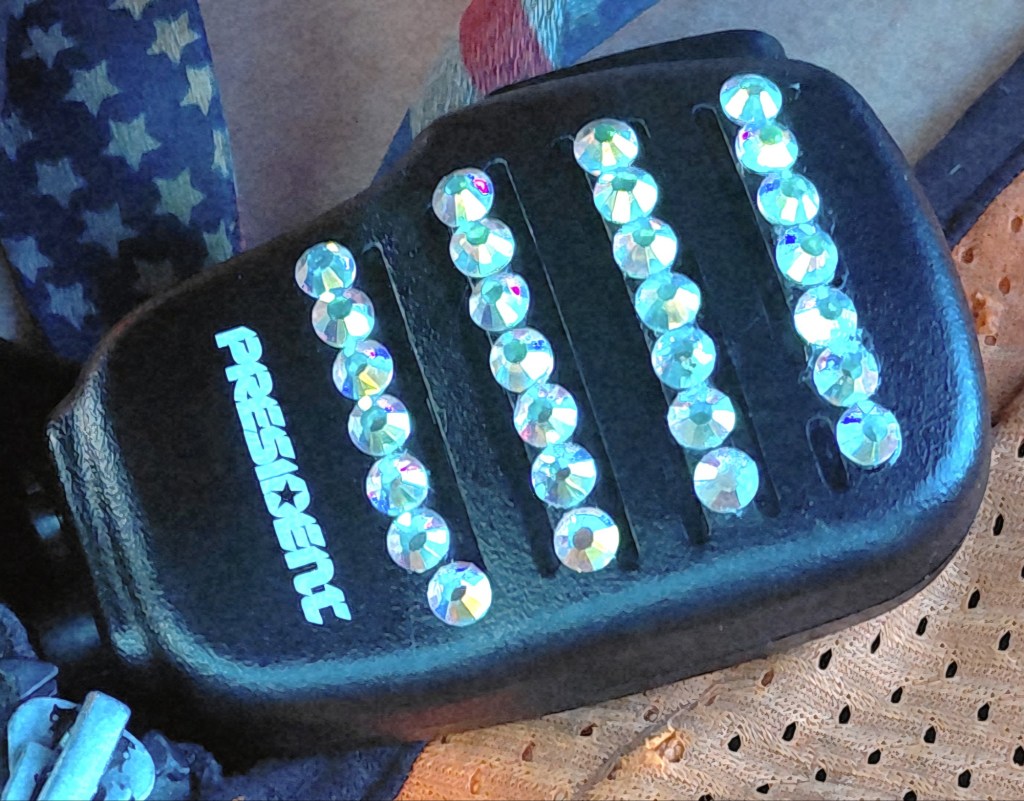
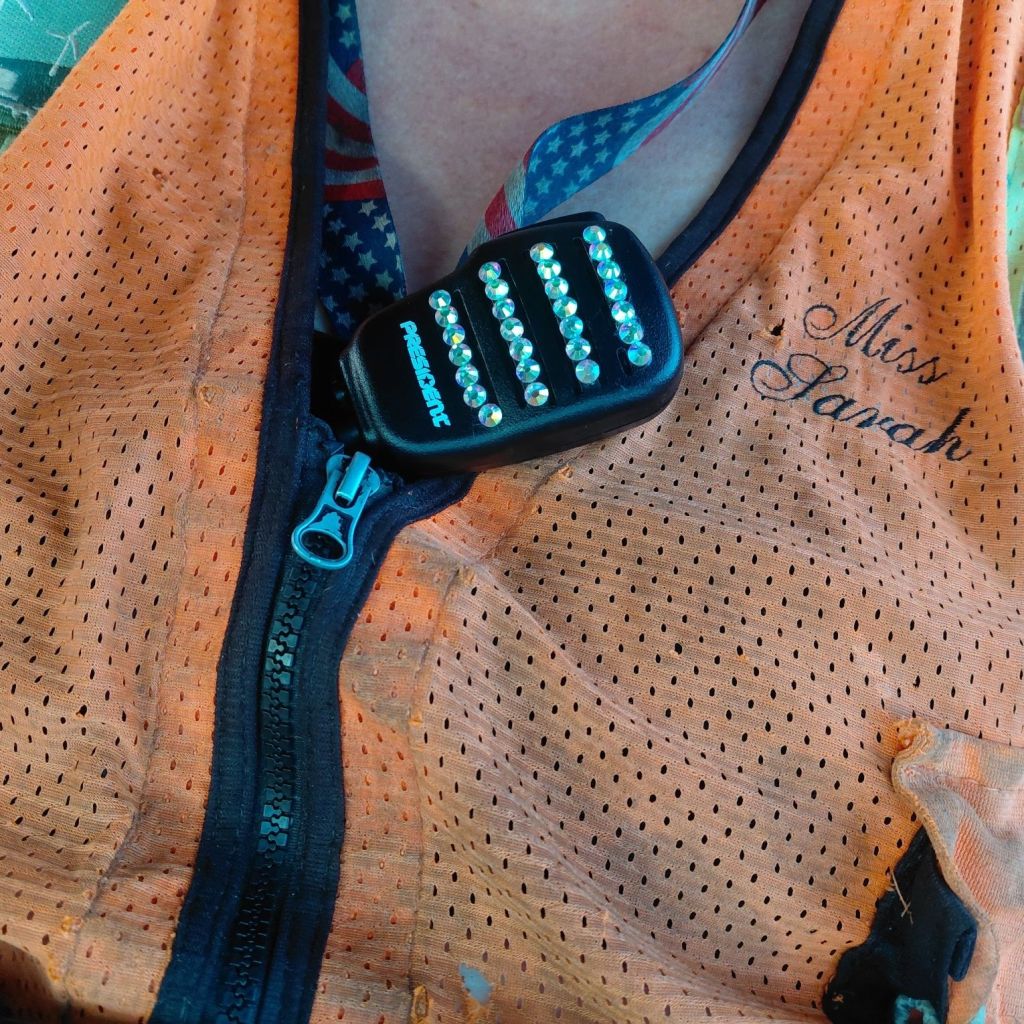
Placement of the rhinestones on your mic/speaker is very important. Look closely at the picture above and you’ll see the stones have been glued onto plastic strips and don’t block the open spaces where you’ll speak into and hear from.My CB handheld is a “President” brand. The mics are pretty small and the size ss20 or 4mm flatback rhinestones worked perfectly. They really sparkle in the bright sunlight. Once at night, A lady stopped to ask me what the little reflectors on my vest were. “Must have been my Rhinestones!” was all I could think of that she had seen.
I had to be really careful of the placement of the rhinestones as they couldn’t interfere with any part of the speaker, microphone or buttons/keys. I wanted them to stand out and look cute, but not too over the top.
I opted to try to stay as minimalist as I could, which with rhinestones is next to impossible. I think I found a happy medium. None of the embellishments interfere with any of the radios’ buttons, microphones or speaker holes and I get the greatest reactions from the rough and tough truck drivers and other pilot car operators.
“Only you Miss Sarah!”, “I wouldn’t expect anything less!”, “No one will wonder who they belong to!”. These comments are always combined with chuckles, shaking heads, smiles and sometimes an out right belly laugh.
A moment of happiness in what can be a very stressful and dangerous job does a heart good.
It’s so easy to take what I’ve done with my radios and a few rhinstones and make something special out of the things you use daily for work.
Make sure you aren’t going to dress up something safety related. For example: gluing rhinestones and other embellishments on to my “Stop/Slow” paddle I use for traffic control isn’t a good idea. *insert facepalm here. A name tag, thermos bottle, purse, lanyard all would be great examples of dressing up to match your personality.
If your going to be gluing embellishments onto something, I really do suggest using the E6000 glue. I’ve used so many types and they’re just don’t work as well. Plastic, glass, wood, diffferent textures of fabrics and even the enameled coat on my thermos bottle have all held what ever I glue to them. As far as longevity; I’ve got a light weight beanie I wear under my hardhat that’s probably 5 years old and a couple of the rhinestones have come off, but that’s about it.
Being the reason a person smiles is pretty cool and you just never know when that smile will be the best part of their day!
Just the right amount of bling-y wonderfulness that says “I belong to Miss Sarah”!
*sometimes the glue and jewel pickers can be a little hard to find. I’m including the amazon links below for the glue, flatback rhinestones and jewel pickers.
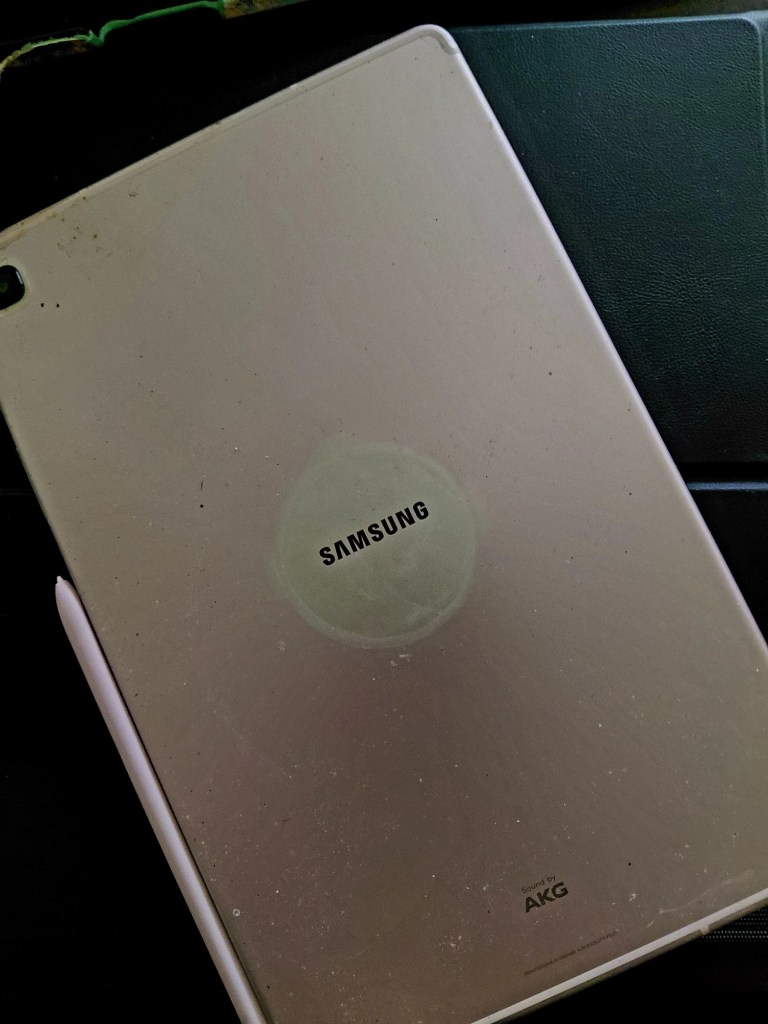
My 2014 Samsung Galaxy Jelly Bean tablet I bought from Costco.
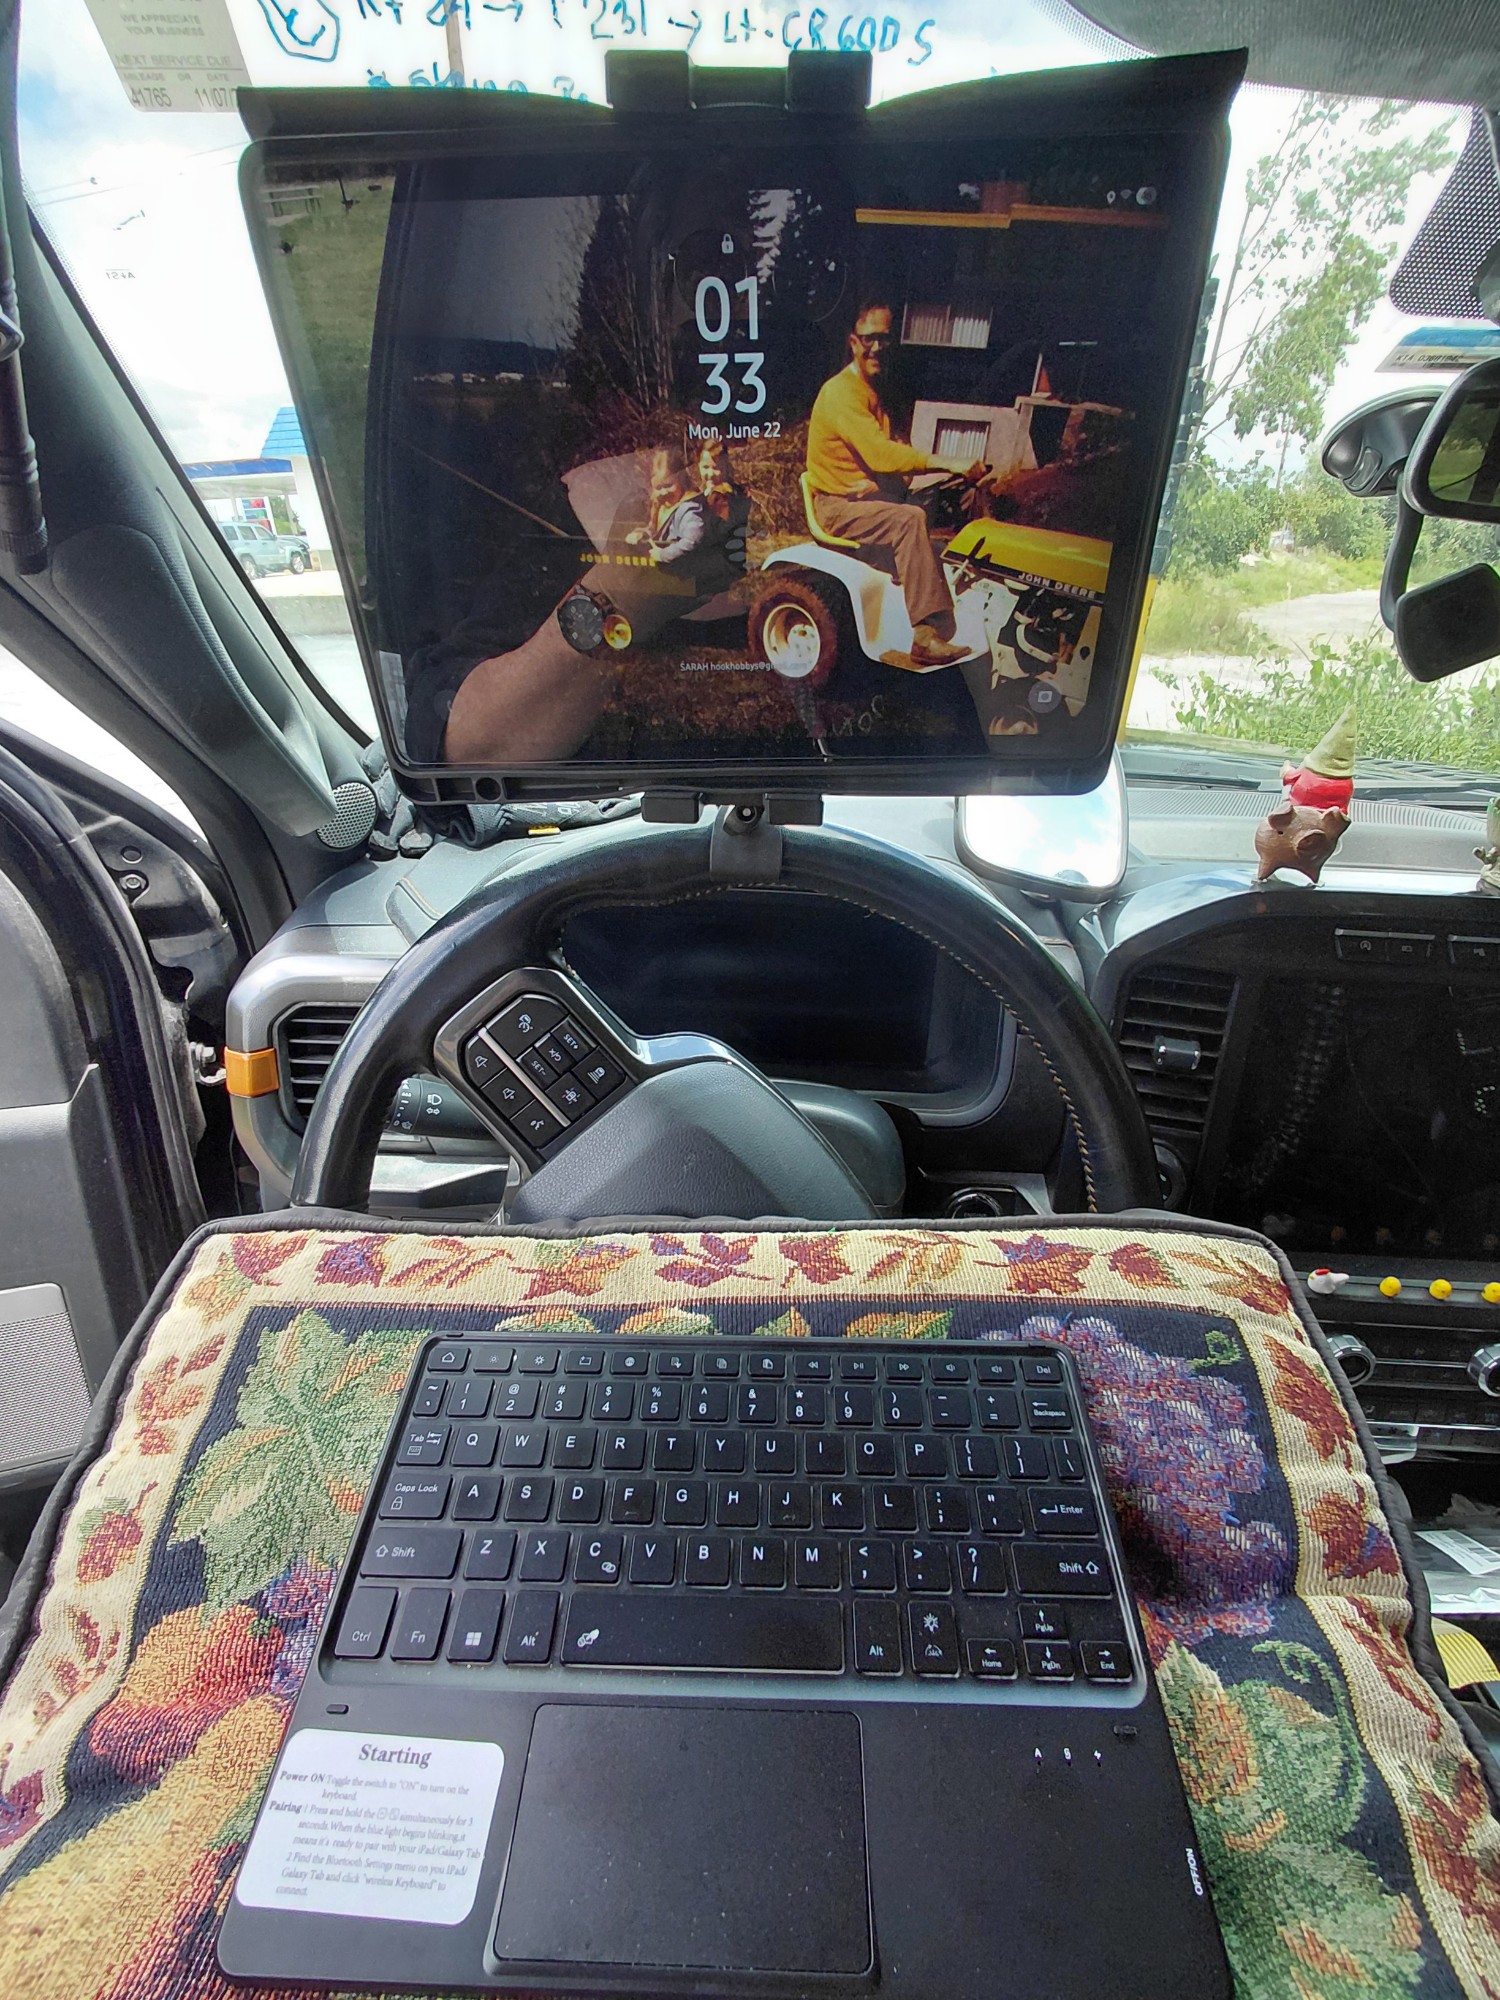
In my job as a Pilot Car driver or PEVO, I spent 90% of my time in my pick up truck and even sleep in a bunk built in the back where the seats were. I spend about 10 months at a time away from home and my office space is the drivers seat and center console. Space is tight so I choose to work on a tablet with a bluetooth keyboard instead of a laptop.
My old beat-up Galaxy Jellybean tablet from 2014 was gettin’ a bit wonky on me. It was time to replace it and I absolutely couldn’t stand the thought of it. I knew I wanted to stick with the Galaxy devices simply because of how much abuse my Jellybean had taken. I prefer androids and the old one had just been so great, even though I’d dropped it too many times to count, I’d used it way more hours at one time than I’m sure it was designed for and it was just plain abused. All of my computer work while I’m on the road is done on my tablet and I knew it was time to replace the old Jellybean that had been such a great little device.
The original Rose Gold tablet color had faded over the years from the case being on it for so long.
Unfortunately it takes me forever to decide on a purchase when I’m buying tech stuff. I have to check reviews, talk to people and research buyers guides. But after all that I decided the Galaxy was the brand I really wanted to stick with. I ended up buying one of the new Galaxy Tab A9+ 256g tablets off Amazon. They had the most reasonable price and returns are way easier than going to an electronics store. It took a while to get all my stuff transferred over from the old JellyBean, but I was so tickled to death with it! I’m a gen-xer and not very tech savvy. Like the Jellybean, the new one is easy to navigate and user friendly. I’ve already dropped it a couple times and about had a heart attack thinking “these newer ones aren’t gonna be as tough as the old Jellybean”. No worries though, it’s just as tough as the old one.
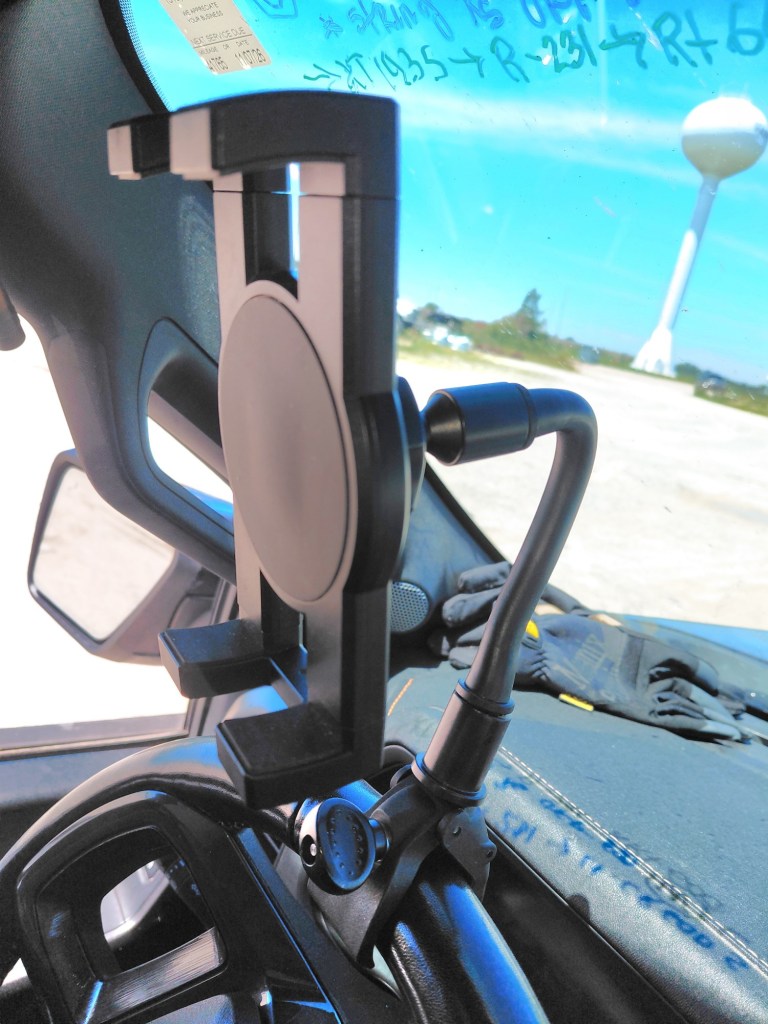
I already had a great little tablet holder that clamps onto my steering wheel and although the new tablet had a bigger 11″ screen it fit fine in the holder with a little room to spare. I put a pillow on my lap for my wireless keyboard to set on and I’m dialed in and ready to blog or get work done on my website.
This tablet holder was designed to go on the handle of a stroller. It fits perfectly onto the steering wheel in my truck. Here is my tablet set up when working in my truck. The tablet holder is clamped onto the steering wheel with the new tablet mounted into it with the bluetooth keyboard laying on top of an old throw pillow.
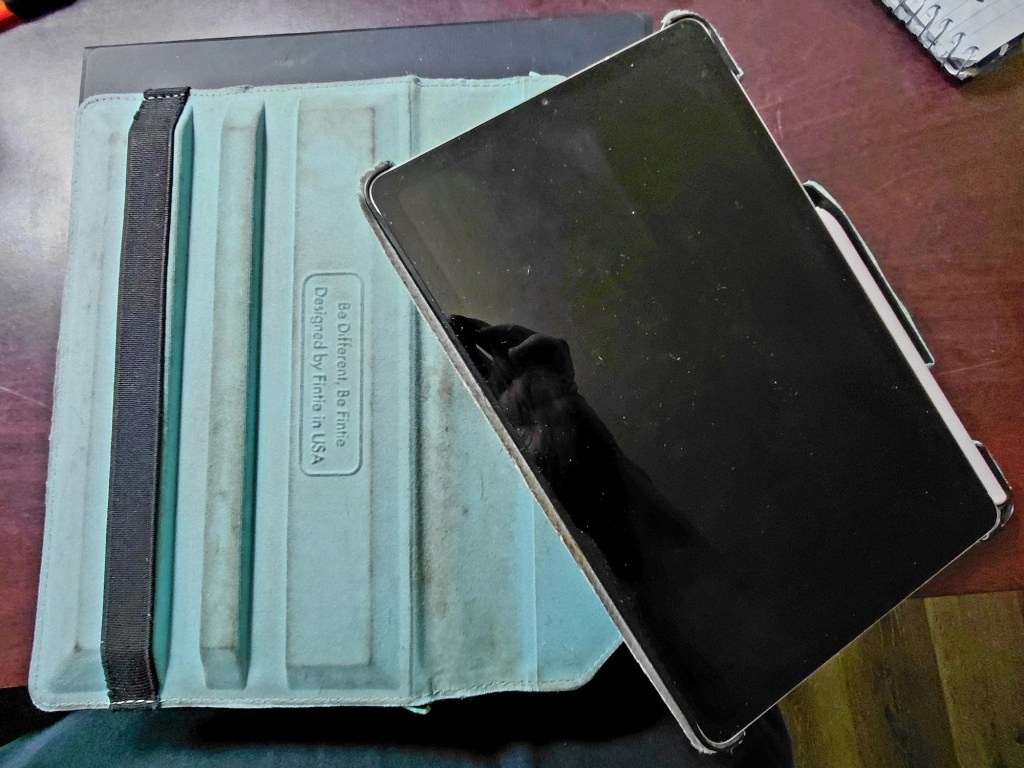
Of course I had to get a new case for the new tablet and my old bluetooth keyboard had the letters worn off of it. It was a folding model and had been duct taped on the hinge and it just wasn’t holding a charge like it had when it was new. I opted for a case/keyboard combo and found one that had a mouse pad on it. Wow! What an upgrade! I also got one which had backlit keys. I didn’t realize I could change the colors on it when I ordered it. So just like my pink hardhat, I chose the pink backlighting. But boy howdy! It was REALLY bright! I needed the lighted keys to be able to work at night, but not so bright as to go blind! I read through the instruction leaflet (actual instructions??? No way! Easy for my old brain to understand too!) and it was super easy to adjust the brightness.
Another thing I got a kick out of was the keyboard had magnets on bottom for attaching onto the base of the case/stand. I didn’t even realize it when I bought it. I don’t usually use it with the keyboard on the case flap, but when I do it sure doesn’t go anywhere. Those little magnets work surprisingly well! A screen protector is a must for me. My sister often calls me “Grace” due to my tripping over air or constantly dropping things. Between the heavy duty case and the screen protector; I know my new tablet is gonna be safe in my clumsy hands.
I’ve hung onto my old one and re-formatted it. Even as old as it is, I use it for my mahjong and solitaire games. I’ve also been able to stream my favorite channels on it as well. Sometimes people laugh about how ratty it looks, but I’m happy it can still be used and will use it until it finally sputters and quits working.
I’ll add links below to my new tablet and the products I got to go with it. It’s a nice feeling to be able to say this is a great product to my followers and these really are! Hopefully this post will save you some time in trying to choose your new tablet and give you some ideas of things to go with it for working while in your vehicle.
As an Amazon associate I earn from qualified purchases. Links at the end.
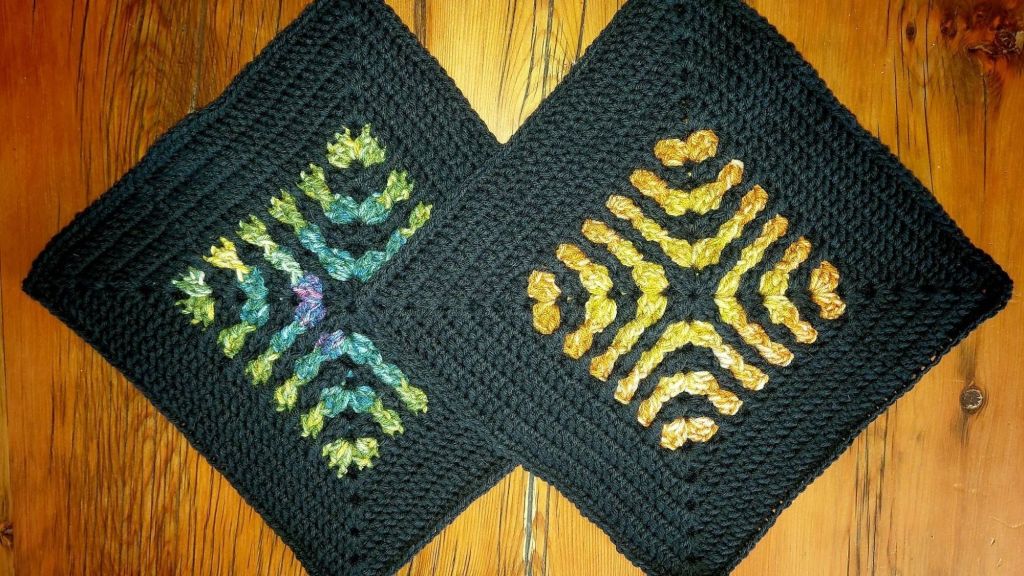
Pot holders are a great way to start figuring out Free-Form crochet. Start with a basic granny square pattern. These pot holders are made up of ch, sc, dc and tr. ALWAYS use stitches you’re familiar with.
I think it was Paul McCartney who said
“I don’t go to therapy, I have my music and that’s my therapy”.
I totally get it because after nearly 50 years of crocheting; crochet is MY therapy.
As with anything that any of us may enjoy doing; my crochet abilities kept growing until my understanding and talent grew until I got to the point where I found myself bored with the same old stitches being used in the same old order.
I could change things up by using new fibers such as Bamboo (a SERIOUSLY advanced type of fiber to work with!), or Merino Wool. I still got bored with the easiness and needed a challenge. I started seeking out advanced patterns wherever I could find them.
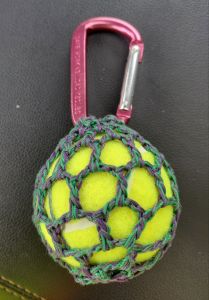
To the left is a really simple example of Free-Form Crochet. A truck driver I work with asked me to come up with something he could throw over a load with a light rope attached for pulling heavy straps over the top to avoid damaging Wind Components. I had an extra Tennis ball (Thanks to my road dog Dakota), an old carabiner and #10 crochet thread from my doily bag. Using 2 strands of crochet thread, sl st and ch I made a net bag around the ball and closed it at the top by working the carabiner into the loops of the net bag. Easy peasy! Months later, the driver is still using it.
With the world at my fingertips and the irritatingly quirky sound of Dial-up internet; I found a what seemed like never free crochet pattern websites. No more ordering pattern books from Annie’s Attic or Kirschner’s. I even had a subscription to a small sized crochet pattern magazine, whose name completely escapes me but as they say “if you know, you know”. *Insert here 5 minute blank stares at the wall while biting my lip in a vain attempt to remember the name of the aforementioned crochet magazine.
Although “I was wet your pants” excited about all these patterns I was able to store in a cool little folder on my dial up computer; it was really just the same stuff over and over. Well DAMN it! Don’t get me wrong, I made some beautiful clothing, home decor and just general bazaar type stuff that made its way to many-a-thrift store donation box.
ENTER FREE FORM CROCHETING!
These Free-Form form flowers were made with vintage buttons and size 10 cotton crochet thread. When choosing buttons to make flowers with, choose ones with holes big enough for the hook your using to go throught the holes. I used a size 7 steel crochet hook for these. Stitches used: sc, dc, tr, dbtr, ch and sl st.I used a fabric pen to draw stems and leaves. They turned out so Cute!
After surfing Pinterest for crochet projects I stumbled on a Free Form applique flower pin. There was no pattern. I thought “why wouldn’t they include the pattern?”. I kept reading on and realized there WAS NO PATTERN! I must have looked for a pattern within the pin for 10 minutes! Finally I started to study the crocheted flower image trying to figure out how they’d done it.
It didn’t take me long to figure out the stitches used were dc, sc and ch. Easy peasy! After fudging around with these simple stitches and studying the image from the Pin, VOILA!!!! I had it! My first try at Free-Form crochet was a complete success!
This epiphany was such a game changer for me. I started looking at images of crochet patterns, zooming in and dissecting them. This meant I sometimes had to download the images and really look close at what stitches were used. But not just the stitches, but the size of the yarn which was used too.
I think one of the first crochet projects I tried as a kid was a potholder so I thought this would be a great little project to try for my first Free-Form project. As I was crocheting a long I realized I had been doing Free-Form crochet off and on for years and just didn’t realize it had an actual name.
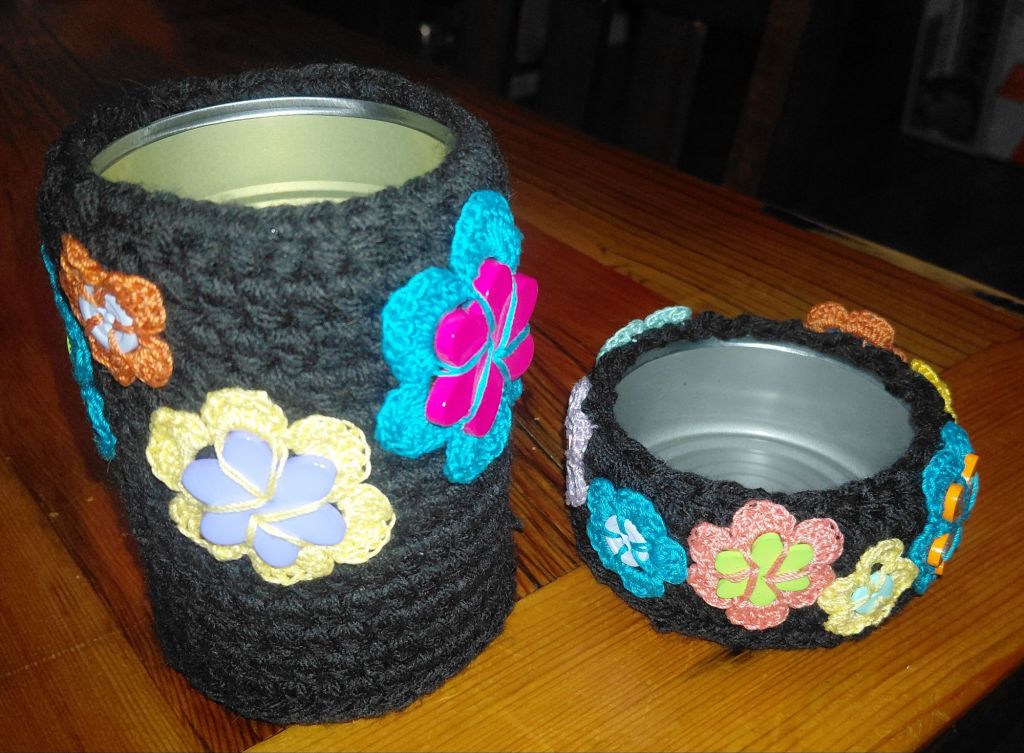
A very basic desk set using veggie and tunafish cans. After peeling off the paper labels and running these cans through my dishwasher, I used worsted weight yarn to crochet a sleeve around each can using sc. When I got them tall enough to be just above the edge of the can I used a yarn needle and wove worsted weight yarn around the top, pulled on it a bit to go over the edge of the can, tied it off and tucked the ends of the yarn down in between the can and crocheted sleeve. I keep a bag of crocheted motifs in my yarn stashand have them handy for projects just like this. There were a bunch of button flower motifs and they worked perfectly for this project.
What I needed was a crash course on new crochet stitches. Pinterest has been a mind boggling experience when it comes to finding new crochet stitches and methods. I started a sub-board titled “Stitches” within my crochet board. At this time this board is up to 115 pins on JUST crochet stitches.
I see my crocheting in a whole different light. I now get an image in my head of what I want to make and combine the stitches I know to create a finished project. This didn’t happen overnight though. I consider myself to be in between a moderate to experienced crocheter. I did have to break the habit of looking at a pattern. I keep a notebook near my crochet chair for notes on more intricate or repeat stitch patterns.
HOLY MACKEREL!!!!
I have a few tried and true Afghan and sweater patterns in which I use the basics of the pattern and go from there. I call this “the bones” or the basic structure of the pattern. One of those patterns is “Baby Rings”; a mile a minute baby Afghan pattern from a pattern book I bought from Annie’s Attic years ago. Except for the basic rings I have changed that pattern every time I make one. I’ve added clusters, PC’s, DC’s, TR’s which are pretty basic crochet stitches. After learning stitches like Bead, larksfoot, bullion and box stitch the end product has turned from the same old, same old into intricate and eye-catching works of art.
Above is one of my versions of the “mile a minute Baby Rings” baby afghans I’ve made. This beautiful little girl lives in Calagry and her daddy and I worked together on an 83m wind turbine blade project going from Washington State to Hannah, Alberta in Canada. I changed things up by using non-traditional worsted weight colors instead of pastel baby colors. Adding cluster and popcorn stitches added texture.
I’ve probably made a dozen of these little baby afghans and each one is different. The only thing that stays the same are the bones of the original pattern which are the rings. I call them “Snuggies” and make them for friends and family who are expecting. For whatever reason babies like texture and lots of color. For me, being able to make something in which people of all ages really like and USE is the most flattering compliment they can give me!
Take the time to learn new stitches and start easy by making swatches of Free-Form crochet. The worst thing about this method of crochet is Frogging and this is where the practice swatches come in as a useful tool. There really aren’t any rules to follow. There aren’t any classes to take or real instructions to follow. Dig around in your scrap yarn for a ball of old yarn, find your favorite hook and let your stitch knowledge run wild. You’ll be surprised at what you come up with. This is such a fun and ever changing way to change up your crochet game.
Check the examples of my Free-Form and let your mind go crazy!
Happy Crocheting! Later Gators, Miss Sarah
Links to Materials Iive used to make my Free-Form projects. I’ve used these brands for years and stand by them 100%. Some brands, Boye crochet hooks are the only brand I use after trying others just to donate them to stick with what works best for me.
“You gotta run the zipper across this bridge”, “We’re gonna have to shoo-fly this pork chop to make it around the left turn”
This is a partial list of Lingo used while piloting oversize/over dimensional loads to help out new PEVO’s who are unfamiliar with industry specific Lingo. Most of these terms are used continually by all members of an oversize crew including the truck driver, front door/pole car, back door and steerman.
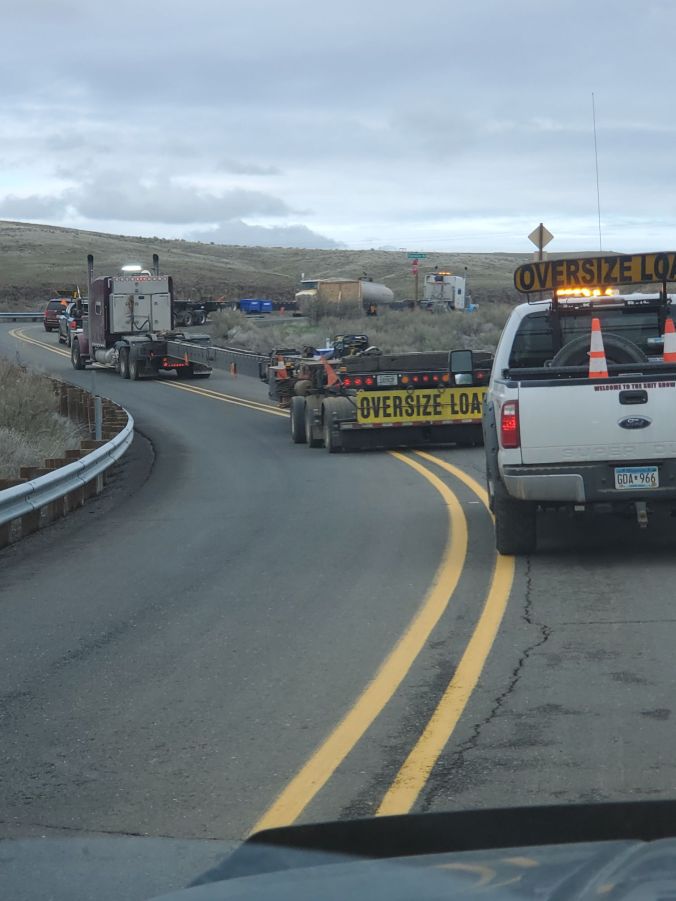
Stretched out Wind Turbine Blade trailers heading to a designated area to shrink up.
PILOT CAR LINGO
Every industry has its own lingo and Oversize/Over dimensional Pilot Car Drivers are no different. This mostly incomplete list will give the Pilot Car Driver, AKA Escort, AKA PEVO (Pilot Escort Vehicle Operator) a good working knowledge of commonly used Oversize terms used to perform your duties as a Pilot Car driver along with some lesser used terms.
There are no training classes per se. Other than the instruction and testing you’ll get when you go through your PEVO certification course; this industry is pretty much all “school of hard knocks” e.g. learning as you go along. This glossary of Pilot Car terms is to help Newbie Pilots. To help them navigate their first few trips until saying these well recognized terms not only helps you to familiarize yourself but it will help you to become a valuable part of any Oversize team.
FOUR Any 4 wheeled passenger vehicle driven by a regular motorist.
TAGA trailer being towed behind a vehicle. e.g., “4 with a tag on the shoulder”
ALLIGATORMore commonly called a GATOR. These are shredded pieces of tires laying in or along the side of the road. *When the tread is facing up, they resemble the backs of alligators.
MUSTARD The yellow striping to the left of lane 1. *The inside or left lane.
FOG LINE The white line at the right edge of the outside right lane (on multiple lane roads) or at the right side of the lane you are traveling in.
ZIPPERThe broken lines separating the lanes or 2 way traffic.
UP Used by the Chase car or Steerman to let the driver know a vehicle is going to pass the load. e.g. “4 and a tag “up”.
18 A Semi truck. Regular sized semi tractor/trailers have 18 wheels.
WIGGLE- WAGON A semi with 2 trailers. In Canada these are referred to as “B-Trains”.
PARKING LOT A semi that hauls passenger vehicles.
BACK DOOR Another name for a Chase Pilot Car. Always at the back of the load. Blocks traffic in lanes when the driver has to change lanes, letting your driver know of approaching traffic that may interfere with the safe travel of the load. The back door also calls out distances of the back axles to the edge of the shoulder on turns when there is no Steerman. *Ask your driver what he/she wants called out.
STEERMAN Also a Chase but their main responsibility as the Steerman is always being located at the back of the load when rolling to allow for Steering the load. Their duties also include helping to Load/Unload.
LEADAlso known as the FRONT DOOR Pilot Car. Duties include reading the permit for routing and pertinent information for the load, instructing the driver/team on turns, warning the driver of obstacles whether in the lane of travel or on the shoulder in which the load has to change lanes or maneuver to get around, accidents, animals entering the roadway etc. *Always ask your driver what they want called out.
WEIGH STATION Also known as a “SCALE or CHICKENSHACK”. Normally all oversize loads will have to enter the scale unless it’s on your permit to bypass it due to permanent closure or construction. You’ll see an illuminated red/green sign with “open” or “closed”. It’ll be about a mile before the scale. Whether the sign reads open or closed, call it out to your team. When you enter, DO NOT DRIVE ACROSS the scale. There’ll be a by-pass lane usually to the left of the scale lane, use this lane for going through the scale.
PORK CHOP Pork chops are small islands that help separate oncoming turn lanes from other turning lanes. They’re found at intersections and usually have a stop sign on them. These small islands look like pork chops.
SHOO-FLY This maneuver involves making a wrong-way turn into the oncoming traffic lane when the turn is too tight or there are obstacles keeping you from making the turn the lane you are traveling in. This often involves an intersection with a PORK CHOP.
GYPSY WAGONA RV or towable camper rig.
SPLITTING LANES This maneuver involves your driver to drive over the top of the ZIPPER separating 2 lanes. Wider loads may choose to do this in heavy traffic. *This is also called RUNNING THE ZIPPER.
CENTER UP This maneuver is literally what it says. It’s used when going through narrower portions of the roadway or across bridges.
OUT This term is specifically for LEAD/POLE CARS “You’re too far OUT”, meaning too far away from the load. “You need to get OUT further”. Meaning you’re too close to the load.
DOWN THE BELLY Meaning down the center of the lane you are traveling in. “metal debris “down the belly”
As I said before, this is by no means a complete list of the lingo used in the Oversized/Over dimensional industry. I can imagine some of these terms sound silly or make no sense to a new pilot but believe me, before you know it you’re going to be using them in normal conversations you have while on the job and may even slip and use them when talking to friends or family while explaining your day as a PEVO. Piloting is not an exact science and talking to 5 different pole cars about how to perform their duties will give you 5 different answers.
My best advice to a Newbie is to take everything in; pretty soon you’ll figure out what is valuable information and what isn’t. NO QUESTION IS A DUMB QUESTION!
Fall is my favorite time of year. My little crock pot comes out from where it’s been hiding in the bottom of a cupboard. I think about the first thing I’ll make in it. This year it was a coffee pot roast with carrots, onions and potatoes. Good old fashioned comfort food, the type that fills you completely and warms you from the very inside of your belly.
For me, fall really starts after our first hard frost. A frost so hard it makes every thing look as though it’s been dusted with powdered sugar. On these mornings, the air is so still and quiet; I can hear a leaf landing on the gravel in my driveway. The deer standing in the valley below my house make huge white clouds from exhaling their breath.
My dad always called this “Indian Summer”. He said it was the sunny days after the first frost of the fall. These autumn days are beautiful. Bright sunshine and cool, crisp, temps that make a person put on an extra shirt and a cap when completing those fall chores. The bright sun shining onto the Big Leaf Maple trees seems to make them glow with the golden colors of fall.
Enjoy the indian summer in your part of the world. Break out that crock pot and prepare a yummy, heartwarming slow cooked supper.
My mother grew up in depression era Iowa, the oldest of 3 daughters of a Share Cropper. She milked cows before going to school and again as soon as she came home. Her 2 best friends were a pig named “Herk” and a mule by the name of “Coley”.
My grandmother was an old school, meat and potatoes farm-wife cook. You woke up to a hot breakfast, came into a good lunch and at 6 o’clock a filling supper with sliced bread on the table and always a pie for dessert. My favorite part of supper was knowing I would be able to dig into that yummy, mouthwatering pie and be in food heaven.
I watched my mom very closely when she cooked. I wanted to be just as good a cook when I grew up. I remembered the coffee she put in every beef pot roast, that is now my “secret ingredient” in my pot roasts. The fluffy pancakes she would make every Sunday morning with lots of hot coffee for the grown-ups and milk for my sister and I. The thing I loved the most was company coming over. Whether it was my dad’s fishing chums, a neighbor or family members; everyone was welcome. There was always a cake, pie or cookies of some sort for them to sit around the living room and enjoy with a hot cup of coffee.
I loved watching my mother roll pie dough. She would dust our kitchen table with flour, use a fork to take out a ball of dough from her mixing bowl and lay it down in the flour. Never handling it too much. “You don’t want to ‘Mother’ that pie dough to death or it’ll be so tough, it won’t be fit to eat!” She would always give me tips of how to handle pie dough the right way making sure I knew it wasn’t bread dough.
Making pie was like second nature to her as I’m sure it was with most women her age. Her recipe was the basic Betty Crocker pie dough recipe. Flour, salt, lard (Crisco at our house) and of course, Ice water. Her wire pastry blender was so old and beat up from making a life time pie crusts that the red paint on the wooden handle was nearly worn through. Her rolling pin was never washed, but only wiped down with a clean cloth. She would stand at the table, cutting in the dry ingredients while turning the bowl and only looking down a couple times while watching Merv Griffin opening his show with some sort of crooner-type love song. Of course the front of her apron always had two hand sized spots of flour on them because a dish towel wasn’t handy.
She had 2 very old tin pie pans that my sister still uses to this day. “Juice Saver” pie pans that were deep dish and wider across than the normal clear glass Pyrex Pie Plates. Her pies were mouthwatering, juicy and the crusts were perfectly flaky. At least in the eyes of a 10 year old tom boy girl.
I made my very first pie the year the Mount St. Helens erupted. In 1980 I was a freshman in high school. It was a blueberry pie for my dad’s work picnic and boy was it UGLY! The blueberry juice had bubbled up through the steam slits leaving dark purple puddles on the crust and it seeped out through the edges where it hadn’t been sealed properly. Ugh…mom said “It’ll be fine”, which was her generic answer to what ever it was which was clearly NOT fine. I put it out on a table at the picnic, one of the ladies sliced and served it with juice running everywhere due to my not adding enough flour in to the filling mixture to thicken it. We took three quarters of it home and it ended up being a nice treat for our chickens that evening when my sister fed them.
Fast forward 20 years in my own kitchen. I had gathered together all the gadgets I needed to mix my pie dough. A rolling pin which I had broken in on many batches of cut-out cookies, an old wire pastry blender I was lucky enough to find at a swap meet. It was like my mom’s, accept mine has a little tab at the end of the handle to put your thumb on. I had a beautiful cranberry Pyrex bowl to mix my dough in and I was ready to go. I had tried my best to make a pie dough that I was happy with, trying not to “Mother” the dough too much while mixing it. I tried recipes that had ingredients like vinegar, mayonnaise even eggs. Nothing was as good as what I remembered my mom’s pie crust tasting like. Finally I saw a recipe for pie crust that called for milk.
I decided to go for it. I didn’t like the taste of regular Crisco. I wanted to try the Butter Flavored kind. Wow! What a difference in taste that made! Changing the liquid to milk, I was really starting to like this new recipe. I also started rolling my pie dough out onto a flour sack type dish towel. I sprinkled flour onto it and rolled out my dough. It made it way easier to control my rolling surface and clean up was a snap. It was also easier to take the towel out into the front yard and shake out the flour and bits of raw pie dough for the dogs and little birds to enjoy.
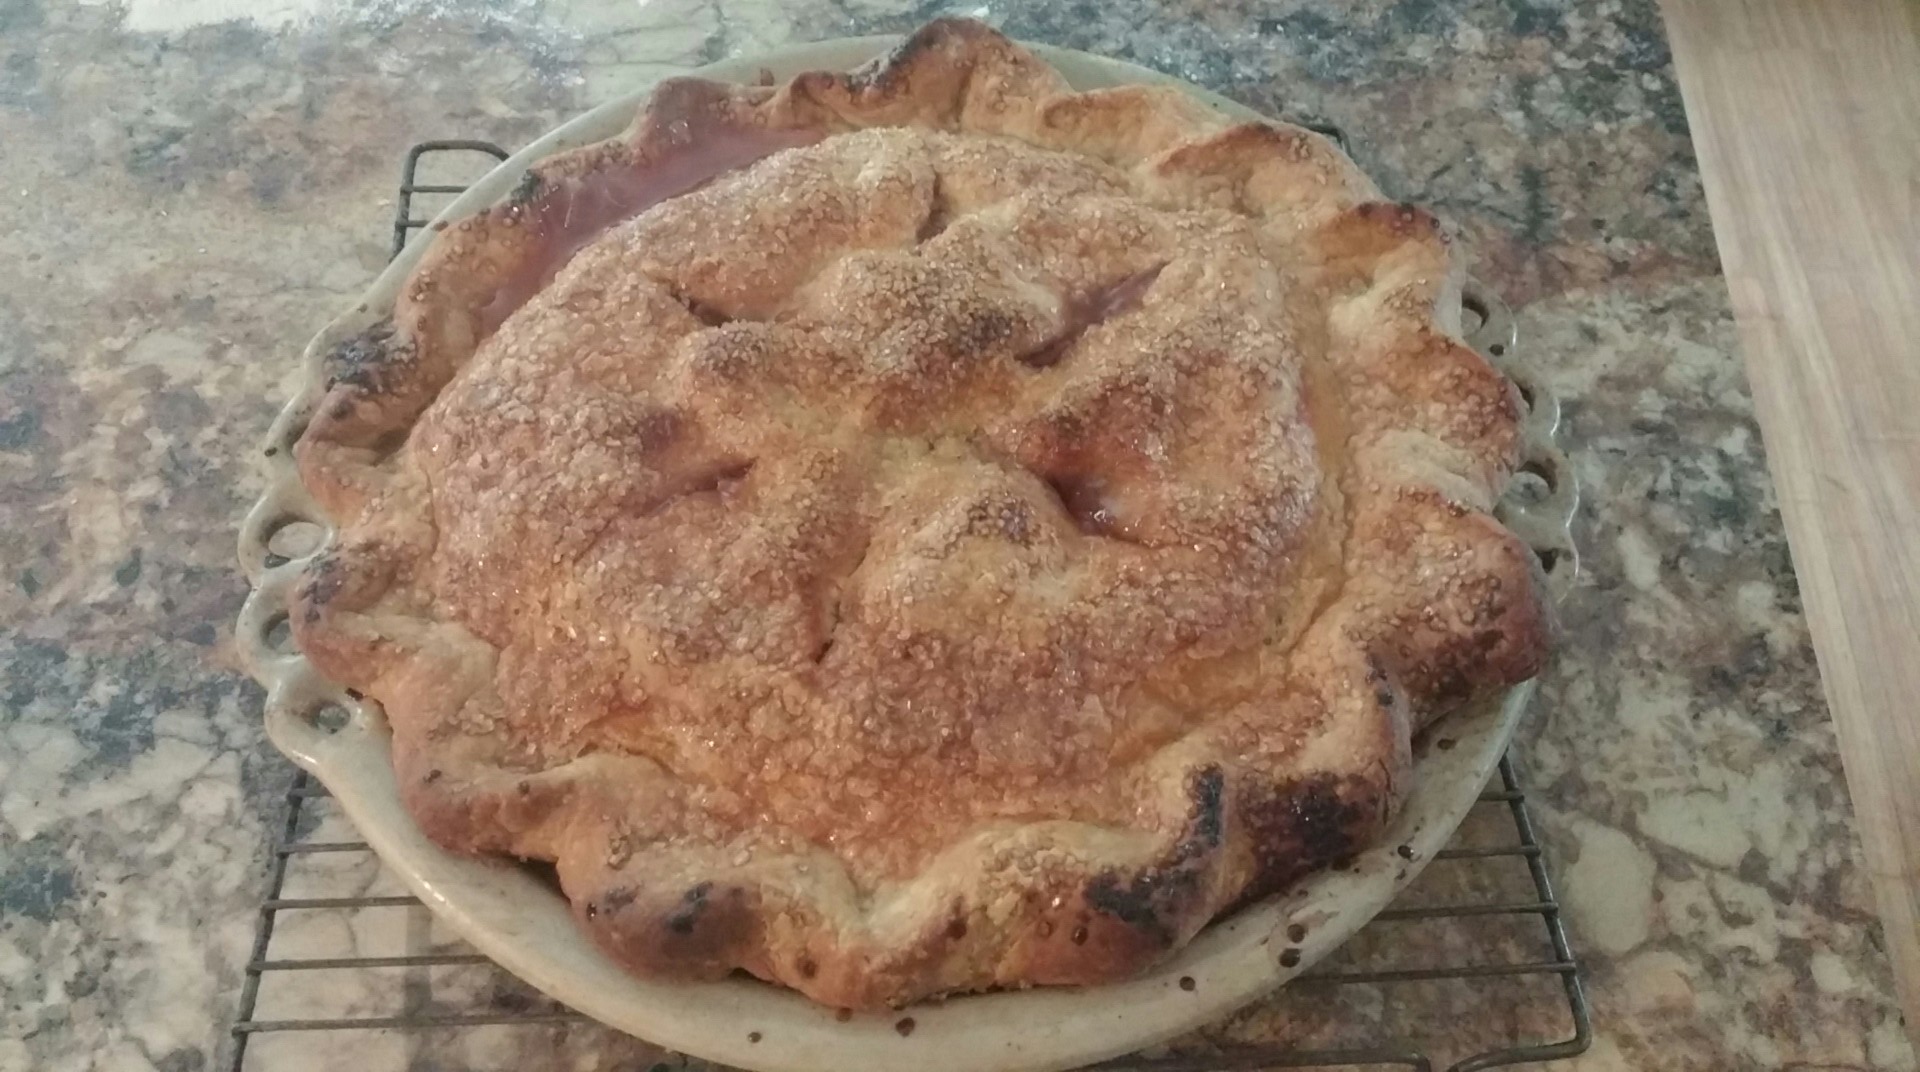
I tried to remember how my mom had put it all together. How did she crimp the edges? How many slits in the top do I need? I checked out cookbooks and looked at pies in the bakery sections of Costco and Safeway. The one thing which stood out in my mind, really made me say “Holy Crap!” was Turbinado Sugar. More commonly known as “Sugar in the Raw”. The sugar crystals are much bigger and have a slight Carmel color to them. Sprinkled on top of these bakery pies gave them a “finished” look; as though the baker actually CARED about the finished product. So after a light spray of water from a water bottle, I sprinkled the Turbinado Sugar lightly all around the raw dough and decided on cutting 6 slits in the top of the pie. I decided on this amount as they could also serve as cutting guides. I suppose other people would cut 8 slits for smaller pieces. I would rather a person enjoying pie and coffee in my home get a good, hearty piece that will give them something to come back for like my mom’s did with her guests.
At the time when I started to experiment with making pies, all I had were metal pie pans. The dough was good, but didn’t seem like it was getting brown enough on the bottom. This is when I discovered Crockery Pie Plates. Ones that had been made of clay on a potters wheel. I have 4 or 5 of these beautiful pie plates. They’re spendy, but well worth the money as the finished product is so nice. I experimented with different pies and found my new pie dough recipe along with baking them in the crockery pie plates was an absolute winner. The smell of a pie cooking makes the whole house happy. Cracking a window or opening your front door allows that smell to waft out into the world. Driving up our driveway and smelling that good smell of pie baking is a treat in its self. Walking over to the kitchen and seeing that beautiful pie plate with a yummy looking creation in it is just icing on the cake! The flaky crust, the little bits of crystals reflecting on top and a peek into one of the steam slits seeing a piece of apple, cherry or strawberry gets your mouth watering and ready for that first scrumptious bite.
After what seems like years, I have found my groove when it comes to pie crusts! The HOLY Grail of pastry! I love to watch a person eating my pie. Their eyes light up, they stop chewing and say “this is REALLY good”. It doesn’t taste like my moms pie. It does evoke the same reaction people had when eating her pie. People talk about my pies like they did hers. That’s as good as it gets for me. The feeling I get when people leave my home and I know they enjoyed their selves; that knowing the time they spent with us made them feel good. A full belly topped off with a delicious piece of pie will do it every time.
Miss Sarah’s Pie Crust
2 cups All Purpose Flour
1 cup butter flavor Crisco or regular butter (at room temp)
1 teaspoon salt (lessen this amount if you’d like)
1/4 to 1/3 cup milk (enough to make a workable dough)
Roll out 1/2 of the dough on a floured surface to 3″ bigger than your pie pan. Place dough in pie pan so that it falls over the edges of your pan. Fill with your choice of pie filling. Roll out second 1/2 of dough and place on top of filling. Fold dough away from you and under its self. Crimp how ever suits you. Spray or baste with water and sprinkle ample Sugar in the Raw on top. Bake at 400 degrees until juice bubbles and pie crust is golden brown.