A new career: Pilot Car Driver

A Pilot Car Driver?  Really?!

20210605_0648343964202310661139653

In 2017, I found myself without a good source of income and thought “Well crap!  What am I gonna do now?”  

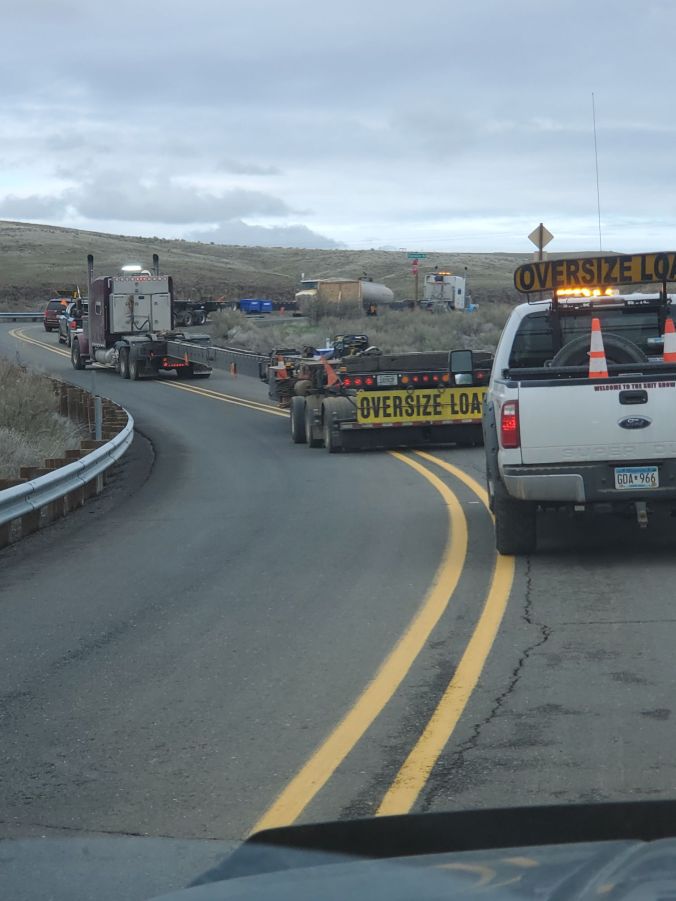
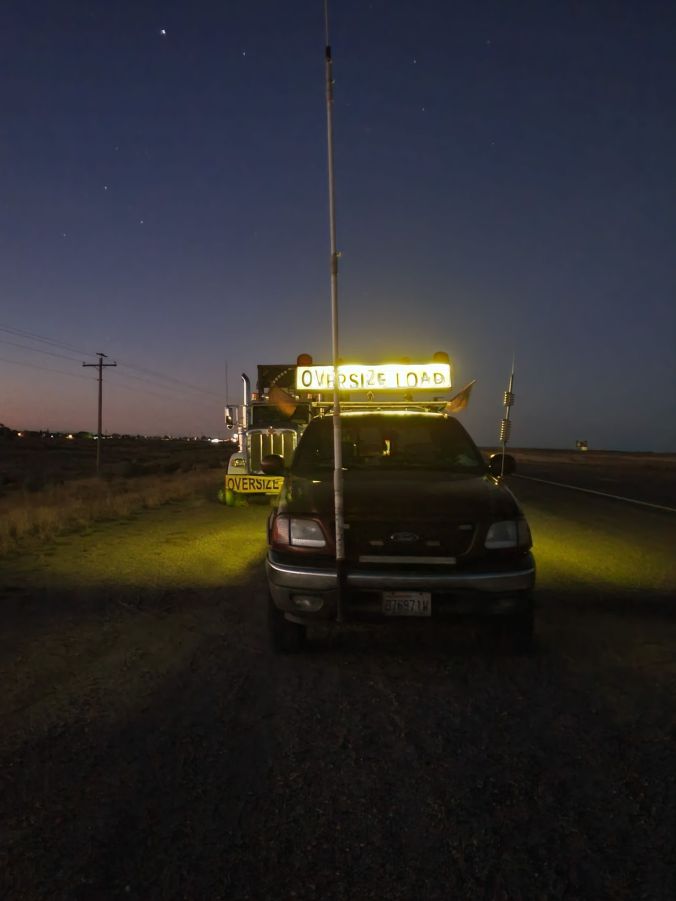
I was driving on Interstate 84 just east of Portland, Oregon and came up on a long, white, skinny thing on a trailer with regular looking cars in front and back. The semi truck hauling this trailer looked like a regular old semi truck, like the ones who have the big boxes.  But the cars that were escorting this load had amber lights on the tops of their vehicles. They also had yellow signs  with “OVERSIZE LOAD” printed in black letters on them.  They both had CB antennas too.  I recognized them as Pilot Cars I’d seen before with Mobile Homes.

I changed lanes into the fast lane and started around this weird looking and massively long load.  As soon as I started to go past it all I could think was “If that guy comes over on me, I’m dead”.  I don’t mind saying it spooked me a little.  I didn’t mean to slow down, but that’s what I did.  The Pilot who was behind the load switched over into the same lane I was in and flashed his headlights at me.  I had no clue why he was doing this, but I mashed on it and got around that load as quick as I could! 

I think all of us have seen the Pilot Cars who escort Mobile Homes.  These were just like those.  I had a basic idea of what their job was and I thought to myself;  “Self, you could do that!”  

Over the next few months I started to see more of these huge white things heading up I-84 and they seemed to come in all sorts of sizes and shapes.  Finally I stopped at the truck stop in Troutdale, Oregon and asked one of the drivers of the “regular” sized semi’s what they were.  “Wind Turbine Components”  he answered, just a bit on the gruff side.  Before I could think, I asked “What’s a Wind Turbine?”.  The expression on his face spoke loudly and I got back in my car and left the truck stop.

During the 1970’s, there were a couple experimental Windmills  up in Goldendale, Wa.  Their blades were red and white.  As a pre-teen kid I thought they were HUGE!  They made a “Whoosh, Whoosh” sound and it seemed like the ground vibrated a little bit. It was crazy cool!  After a conversation with my sister, I realized those old windmills up in the gorge were early versions of Wind Turbines.

20220309_0705213579965604062507574
An old photo of one of the Wind Turbines in the Goldendale, Wa hills circa 1978

I started looking around on the internet and found out what a modern day wind turbine was, how they were made, what the parts were and most of all, how they transported them.  Then I started to research how to become a Pilot Car Driver in Washington State, where I live.  

The biggest thing I learned,  and damned quick, is there aren’t any classes ANYWHERE that a person signs up for and takes that teaches you HOW to become a Pilot Car Driver.  This industry is based literally on the “School of Hard Knocks”.  

The first thing I had to do was to get a certification to operate a Pilot Car.  In Washington State the only place to get one was located north of Seattle. I was able to sign up  and pay my $300 fee online for the course  well in advance of when I had to actually attend it.  I received a study guide in the mail and started studying.  Now this was in 2018 and before “On-Line classes” or “Zoom” meetings  were even a thing.  Needless to say if you needed to get a new certification or renew your old one, you had to find a place to go to a class and not every state had a testing facility.

I  live near the Columbia River, which is our state’s southern border and had to go within about an hour of our northern border.  This meant I had to travel some 200 miles to get to the testing facility and spend a day in class.  At that time, 200 miles was a long way to drive so I decided to head up there the day before, get a motel and be ready to go the next morning.  

I arrived early and there were already a few vehicles there. More people started to arrive in all types of Pilot Cars.  Passenger vehicles, Pick-ups, full size and minivans of all conditions were pulling in and parking.  A few of these Pilots were getting out of their vehicles as though they had stayed the night in their rigs, right there in the parking lot!  It kind of took me aback and made me a little curious.  There was time before class where people greeted other Pilots they knew and pretty much every one visited with everyone else.  I stood there listening and soaking in as much info as I could.  

Then I noticed the license plates.  Very few were from Washington State.  They were from all over, there were even rigs with Texas plates.  I actually laughed about it and said something to one of the gentlemen standing next to me.  He nonchalantly said “Oh yeah, we’re from all over.” He asked  if this was my first time getting my certification. Now, I’m sure by the expression on my face and the way I was gawking at all the rigs,  I didn’t have to say yes, but I did.  He chuckled and said “Welcome to the game!”.  

What an understatement.

Somewhere in a state that I didn’t need to run with my top sign up.

The class lasted about 8 hours.  There was a test that had about 50 questions on it.  They went over required equipment, safety, flagging basics, Oversize Load Permits etc.  It was all super basic information about communicating with your team and how to keep the “Motoring Public” safe when traveling near and around an  oversized load.  

I really learned more about the job and what I needed to do to be ready to hit the road from listening and chatting with people who were in the class.  There was a chapter in the study guide listing the basic equipment I needed to buy.  There was also a little blurb about insurance.  Standard car insurance wasn’t gonna cut it.  In fact if I didn’t have commercial insurance, there wouldn’t be any of the heavy haul companies  who would even talk to me.

After taking and passing my Pilot Car Certification test I drove home.  The next day I started researching where to get my needed equipment for the vehicle and try to figure out what my options were for the insurance.  

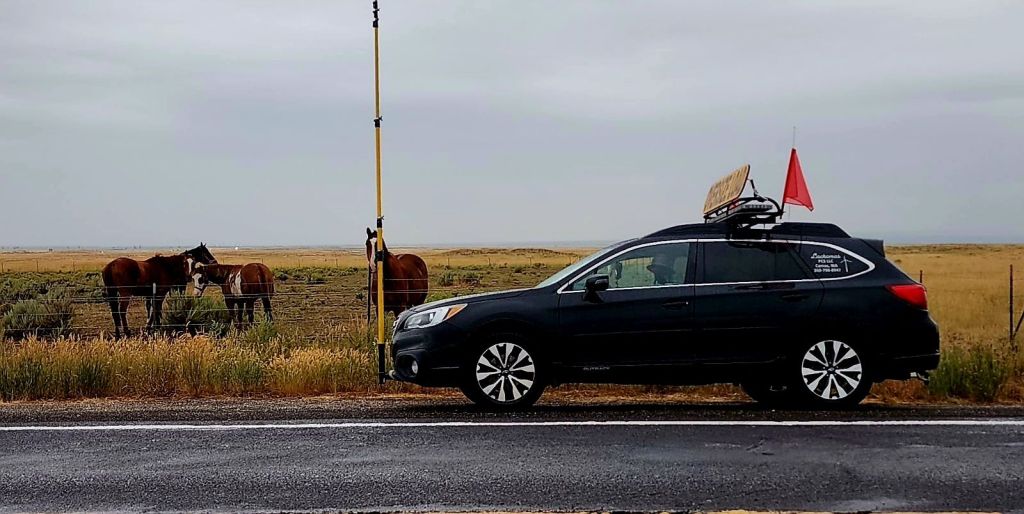
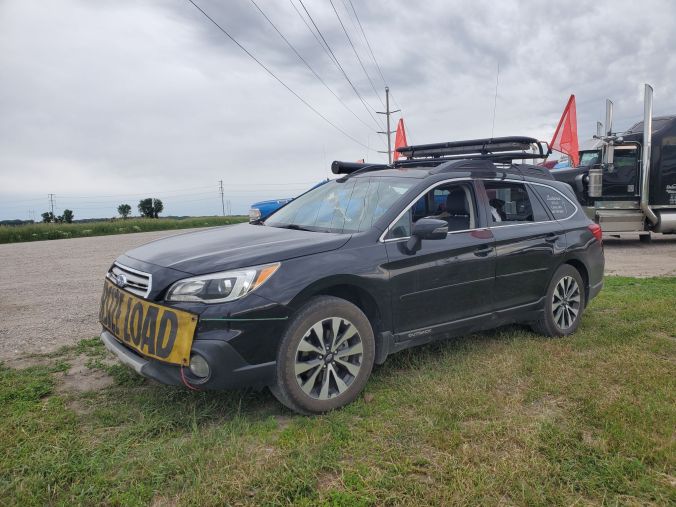
I was able to order most of the things I needed through Amazon.  My first amber light bar was 18” long and plugged into my cigarette lighter.  It had magnets to hold it onto the roof of my truck.  I ordered 18” orange flags on wooden dowels, an 18” stop/slow paddle, A yellow high-viz construction vest, first aid kit, a handheld cb radio, a set of 3 collapsible triangles, 2 “OVERSIZE LOAD” banners and 3 orange plastic cones.  About $300 later I had most of my basic equipment to get me going. 

I picked up a fire extinguisher at Costco and I had an old beat up CB radio and antenna up in our family’s shop.  I was shocked when I hooked it up in my truck and the damn thing actually turned on.  As a CB’er in the ‘80s, I had a pretty good working knowledge of how to get it set up and how to use it.  

My current CB, a “President Bill” by President radios. Above that is the controller for my amber light bar. To the left of that is an external speaker for the CB.

I fiddled around with it in my driveway talking to local logging and construction truck drivers.  It got out really good for its age and I was able to hear the drivers who were responding to me pretty well too.  

Thank god for Google!  I started looking for Commercial Insurance Companies and making calls.  After a morning of phone calls and a couple pots of coffee this is what I found out. 

Finding insurance companies who cover Pilot Cars were few and far between.  They were also ungodly expensive.  But I finally found a company up near Seattle that worked with a lot of logging companies and they insured Pilot Cars. I had a 2003 Ford F150 Crew cab and the commercial insurance for the year was over $3500.  I found out later that amount was pretty cheap.  I was in my early 50’s and had a perfect driving record. 

I then learned I needed to have a business license.  OIY!  I was really overwhelmed at the amount of paperwork it took to get it.  I worked for 3 days solid and had finally figured out a name I wanted for my business, got my business license application turned into the state and filed for my IRS tax ID number.  About $500 later I felt good about my accomplishments.

But WAIT!  I had no one to work for! I looked up a few companies who transported Oversize loads and they all said they went through “Brokers” for their Pilots.  So I naively started my new entrepreneurial endeavor working for an unscrupulous broker I had met while taking my Certification Course.  What a nightmare THAT turned out to be!  He charged me a 25% broker fee, gave me absolutely no guidance and ended up owing me over $2500 after 3 months of working.  I decided right there and then I wouldn’t be working for any broker based on this experience. 

resized_20240206_1426042977692833361802732
A great example of an overheight load with its pole car out front. *Thanks to one of my O/S drivers, Scott from Indiana for the image.

So once again, I had no one to work for.  Well, Martha shit the damn bed!  Back to the truck stop in Troutdale I went.  There were quite a few Oversize loads parked behind the store  and If I saw the driver was sitting in their seat, and awake,  I’d ask if I could pick their brains about Piloting.  I can’t remember a single driver turning me down when I asked them about the Oversize/Over Dimensional trucking industry.  Sometimes it  was the opposite.  I could hardly get away from them!  

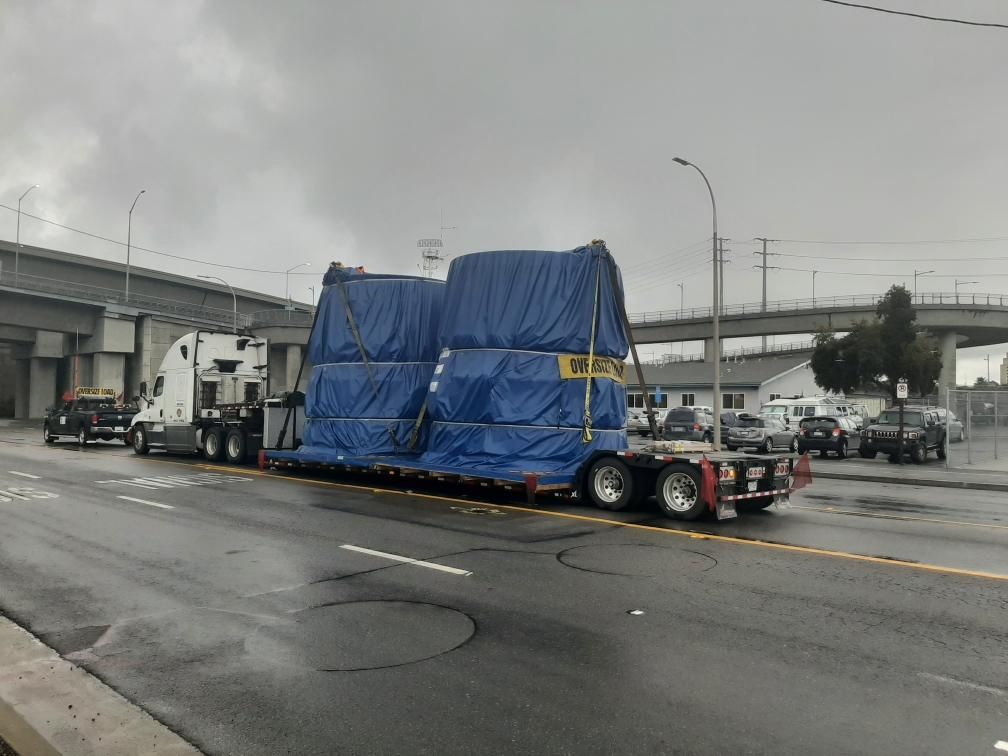
I started taking notes and writing down the Company names from the sides of these trucks.  Then I saw a weird looking trailer that had a sort of half round and lumpy thing on it. It was covered with white shrink wrap and as I drove over to it I saw the word “Goldwind” printed in blue letters on the plastic and realized this had to be a wind component.  Turns out it was a “Hub”.  This is the part that the turbine blades are bolted onto. 

That one driver, who took time out of his day to talk to me about Piloting Wind Components literally changed the course of my Piloting career and was a key part of my becoming a Pilot Car Driver for Wind Energy.  I can’t remember his name or who he drove for and I’ve never seen him again. 

Since then, I’ve been as far as Western Tennessee, Escorted Blades out of the Port of Houston, Texas, ran with components into Alberta, Canada and all over the midwest.   I’ve made a pretty good living out of Piloting and met/made friends with some really extraordinary people from all walks of life and from all over the United States and Canada. 

Getting ready to head out for a night move. The lighted sign is a Canadian style top sign. The white pole is my “height pole” or “high pole” set to 6″ above the height of the pole.

I’ve been Piloting pretty much just in Wind Energy. It’s not that I’m opposed to Piloting other types of Oversize/Overdimensional loads;  I just really enjoy wind loads.  Most of them are classified as “Super Loads”  which are most commonly over 16” wide, 16” high’ at least 125” long and 200,000lbs or above.  

No matter how many times I see these monster sized component loads,  I’m blown away by them.  Just the logistics it takes to get them from one place to another is mind-boggling. When you add the amount of people involved in getting them transported, the crews and equipment it takes to not only load them on and off the trailers but the people involved in actually putting all the pieces together and getting them set up in the wind farms, it’s really unbelievable. 

20220314_1433096196820810620851700
Wind Turbine components on a wind farm sitting at the foot of a tower waiting for the blades to arrive so the techs can finish the Turbine installation.

I got side tracked there and all that mess will be saved for another blog post.  Piloting is definitely not for everyone.  I’ve learned how to save my money for lean times.  I’ve had to learn how to pee between the open doors on my rig as with these loads there isn’t always a restroom readily available.  I’ve learned how to deal with different types of personalities which has made me a much more tolerant person.  The endless waiting for permits has taught me patience.  But I think the biggest thing I’ve gotten out of piloting is this: it’s truly a way of life.  When people ask what I do for work, I tell them I’m a Pilot Car Driver.  Most people look at me a little on the befuddled side and say “Oh”.  It always makes me chuckle.

Keep an eye out for more posts on piloting.  

Pilot Car (PEVO) Lingo

“You gotta run the zipper across this bridge”, “We’re gonna have to shoo-fly this pork chop to make it around the left turn”

This is a partial list of Lingo used while piloting oversize/over dimensional loads to help out new PEVO’s who are unfamiliar with industry specific Lingo. Most of these terms are used continually by all members of an oversize crew including the truck driver, front door/pole car, back door and steerman.

PILOT CAR LINGO

Every industry has its own lingo and Oversize/Over dimensional Pilot Car Drivers are no different.  This mostly incomplete list will give the Pilot Car Driver, AKA Escort, AKA PEVO (Pilot Escort Vehicle Operator) a good working knowledge of commonly used Oversize terms used to perform your duties as a Pilot Car driver along with some lesser used terms.

There are no training classes per se.  Other than the instruction and testing you’ll get when you go through your PEVO certification course; this industry is pretty much all “school of hard knocks” e.g. learning as you go along. This glossary of Pilot Car terms is to help Newbie Pilots.  To help them navigate their first few trips until saying these well recognized terms not only helps you to familiarize yourself but it will help you to become a valuable part of any Oversize team.

FOUR Any 4 wheeled passenger vehicle driven by a regular motorist.

TAG A trailer being towed behind a vehicle.  e.g., “4 with a tag on the shoulder”

ALLIGATOR More commonly called a GATOR.  These are shredded pieces of tires laying in or along the side of the road.  *When the tread is facing up, they resemble the backs of alligators.

MUSTARD The yellow striping to the left of lane 1. *The inside or left lane.

FOG LINE The white line at the right edge of the outside right lane (on multiple lane roads) or at the right side of the lane you are traveling in.

ZIPPER The broken lines separating the lanes or 2 way traffic.

UP Used by the Chase car or Steerman to let the driver know a vehicle is going to pass the load. e.g. “4 and a tag “up”.

18 A Semi truck. Regular sized semi tractor/trailers have 18 wheels.

WIGGLE- WAGON    A semi with 2 trailers.  In Canada these are referred to as “B-Trains”.

PARKING LOT    A semi that hauls passenger vehicles.

BACK DOOR    Another name for a Chase Pilot Car. Always at the back of the load. Blocks traffic in lanes when the driver has to change lanes, letting your driver know of approaching traffic that may interfere with the safe travel of the load.  The back door also calls out distances of the back axles to the edge of the shoulder on turns when there is no Steerman.  *Ask your driver what he/she wants called out.

STEERMAN Also a Chase but their main responsibility as the Steerman is always being located at the back of the load when rolling to allow for Steering the load. Their duties also include helping to Load/Unload. 

LEAD Also known  as the FRONT DOOR Pilot Car.  Duties include reading the permit for routing and pertinent information for the load, instructing the driver/team on turns, warning the driver of obstacles whether in the lane of travel or on the shoulder in which the load has to change lanes or maneuver to get around, accidents, animals entering the roadway etc.  *Always ask  your driver what they want called out.  

WEIGH STATION   Also known as a “SCALE or CHICKEN SHACK”. Normally all oversize loads will have to enter the scale unless it’s on your permit to bypass it due to permanent closure or construction. You’ll see an illuminated red/green  sign with “open” or “closed”.  It’ll be about a mile before the scale.  Whether the sign reads open or closed, call it out to your team. When you enter,  DO NOT DRIVE ACROSS  the scale.  There’ll be a by-pass lane usually to the left of the scale lane, use this lane for going through the scale. 

PORK CHOP  Pork chops are small islands that help separate oncoming turn lanes from other turning lanes.  They’re found at intersections and usually have a stop sign on them.  These small islands look like pork chops.

SHOO-FLY This maneuver involves making a wrong-way turn into the oncoming traffic lane when the turn is too tight or there are obstacles keeping you from making the turn the lane you are traveling in.  This often involves an intersection with a PORK CHOP.

GYPSY WAGON A RV or towable camper rig.

SPLITTING LANES   This maneuver involves your driver to drive over the top of the ZIPPER separating 2 lanes.  Wider loads may choose to do this in heavy traffic. *This is also called RUNNING THE ZIPPER.

CENTER UP This maneuver is literally what it says.  It’s used when going through narrower portions of the roadway or across bridges.

OUT This term is specifically for LEAD/POLE CARS    “You’re too far OUT”, meaning too far away from the load.  “You need to get OUT further”.  Meaning you’re too close to the load.

DOWN THE BELLY Meaning down the center of the lane you are traveling in.  “metal debris “down the belly

As I said before, this is by no means a complete list of the lingo used in the Oversized/Over dimensional industry.  I can imagine some of these terms sound silly or make no sense to a new pilot but believe me, before you know it you’re going to be using them in normal conversations you have while on the job and may even slip and use them when talking to friends or family while explaining your day as a PEVO.  Piloting is not an exact science and talking to 5 different pole cars about how to perform their duties will give you 5 different answers.  

My best advice to a Newbie is to take everything in;  pretty soon you’ll figure out what is valuable information and what isn’t.  NO QUESTION IS A DUMB QUESTION!  

image000000(7)4433203676251650895
Curious Horses checking me out in Dubois, Idaho

Pot Holders made for BIG hands

Stitches used: Slip Stitch, half double crochet, double crochet

Why are manufactured pot holders so little and thin? If you grab a hot pan out of the oven in MY kitchen, by God and sunny Jesus you are NOT gonna burn your hand!

I have a lot of scrap yarn left over from my various crochet projects. I save every bit of it too! It gets rolled up into little balls and stuffed into an old beat up Safeway paper grocery bag. I keep all sized pieces of yarn from a yard long and up. The little bitty pieces, get tied end to end and then rolled into a ball about the size of an orange. I use this ball for small projects that provide me with what I call “Instant Gratification Projects”.

Instant Gratification Projects take about as long to make as an episode of “Coach” lasts. They take zero thought and even less effort. Most all of us who these projects cause they’re done in a flash and you can look at the finished product and say to yourself “Looky what I did!?”.

Does that sound silly? Well, duh! Of course it does but the big take away is the Gratification of finishing a project. No matter how big, or in this case, how small. It may just be a scrap granny square that you add to a pile of other scrap granny squares to crochet together to make a scrap blanket with but you’ve finished it in no time! *please take into consideration all of us have projects sitting somewhere in a bag that’re only partly complete, that we’ll get to “tomorrow”.

Enter the homemade, crocheted Pot Holder. The method I use to make these is now referred to as “Free-form” crochet. I used to call it “winging it” as I’m sure most other old timers did. Free-form crochet doesn’t require a pattern no matter what you want to make. I guess this is Free-form crochet in it’s simplest form and you really don’t need a pattern to make these but you need a basic idea in your head of how you want it to look. I keep all the extra motifs, granny squares, parts of crocheted borders I’ve made up to see if I like them etc in a zip lock bag just to use for pot holders. If you don’t have any extra parts crocheted and stashed somewhere; grab your favorite hook, make a chain or circle or whatever turns your crank and just start to crochet!

Even beginners know a few stitches. It hasn’t got to be fancy, don’t chew on what or how you’re gonna do it, but here is the important thing to remember that a lot of us overlook when making these; SAFETY!

Size and Thickness *insert 12 year old giggle here*. It’s true though, when I grab for a pot holder in my kitchen, it’s to pull out a 400+ degree metal pan from the oven to get on the counter quick. I want to make sure I don’t burn my hand or my pretty counter tops.

Crochet a shape, lay it down and put your hand in the middle of it. If your fingers hang over the edge of your crocheted piece, you got a ways to go! I always make sure I have at least 2″ of space bigger than the size of my hand. I have sausage fingers, pure and simple. If it’s a horse call it a horse. Occasionally, people with bigger hands than me have to get something out of my oven. Mostly I worry about a man or Amazon size Lady Friend. It doesn’t matter who it is, I don’t want someone burning their hand using a pot holder that’s way too small.

There are always 2 layers to my pot holders. So after you get your first side the size and shape you want it, make another one. It doesn’t have to be the exact match of the first one. It can just be one color. Make it as close to the size of the first one as you can. After all, these are going to be used as “Trivets” too. A Trivet is something you sit on your counter to put a hot pan on. Another reason to make them good and thick.

After you get the second side done, lay one on top of the other and figure out how you want to crochet them together. In the first photo, I’ve Slip Stiched the 2 sides together on both pot holders because one side was just a smidge bigger than the other. This works out great! In the second photo, I did a single crochet stitch clear around. Both layers were close enough in size, so I simply crocheted singles through both layers.

20250202_0959062481074296094184179
Stitches used: double crochet, single crochet, slip stitch

In the photo above, I used a basic shell to crochet the 2 sides together. For the brown one on the left, I added a slip stitch row just to play around with it. As far as weaving in the ends; I insert my hook in between the 2 sides and near the middle of one side. Which side doesn’t matter. Work the hook through those sides up to where there’s a hole at the tail of the yarn. Yarn over and pull the tail in between the sides. Give your pot holder a stretch and the end of the yarn should disappear inside. If not, pull it just a little tight, snip off the end and then give it a stretch and your tail will be pulled inside the potholder. Don’t worry, I’ve not ever had one come apart on me in all the years I’ve been making these.

I work with a lot of bachelors or gentlemen who are the cooks in their homes. Every single one of them are shocked at these simple pot holders. The comments always seem geared around “it’s actually BIG enough for my hands”!

You can’t buy these in any stores, they’re easy to make and last forever. I use acrylic yarn and have not had an issue with them scorching from a hot pan. If you get “whatever” baking goo on them just pitch them in the washer/dryer and call it wonderful!

That’s it my babies! Use your imagination and as always HAVE FUN!